This guide will run you through the steps of how to delete the cached files for Microsoft Teams. One reason this may need to be done is because a user’s name/account appears twice when attempting to add them to a Team or invite them to a meeting. Deleting the cache solves this issue.
Checking if you are experiencing issues.
The first step before continuing to follow the guide below is to check whether you are experiencing the issue.
For the example given above, see below.
- First attempt to add a user to a Team or invite them to Teams meeting. This should be a user that has reported a problem.
- If you see that user twice over when searching for their account, this means that you need to delete your Teams cache to prevent any further issues.
Guide
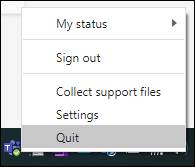
- First, fully quit Microsoft Teams. This can be done by finding the app icon in the bottom right of your screen, on the taskbar. Right-click this icon and select “Quit”.
- Now open File Explorer, this is the folder icon either on your taskbar, or on your desktop. You can also use the search bar/icon in the bottom left to search for “File Explorer” or open any folder – as long as you follow the next step carefully. See icon below for reference.

- With the File Explorer window open, please copy and paste the following text into the file path (top) bar indicated in the screenshot below. You can select the bar using left-click on your mouse. Please make sure the bar matches the screenshot.
Copy this: C:\Users\hp\AppData\Roaming\Microsoft\Teams
Paste here:
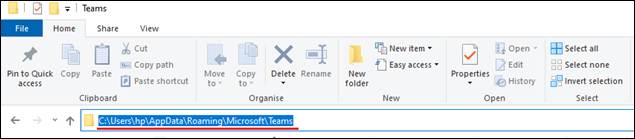
- After pasting the file path into the bar, press ‘Enter’ on your keyboard. Then find the “Select all” button on the ribbon under the home tab at the top.
You may have to first expand the ribbon by finding the small downward facing arrow in the top right of the window.

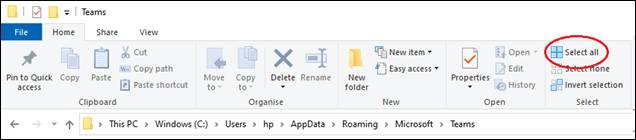
- After using the “Select all” button, press ‘Delete’ on your keyboard or use the right-click on your mouse to select “Delete”.
If a new window appears asking you to “Try again” or “Skip”. Please select “Skip”. You may have to do this more than once.
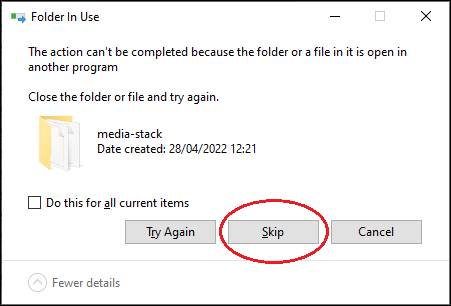
- Now re-open Microsoft Teams and check if the issue still occurs.
Was this article helpful?
That’s Great!
Thank you for your feedback
Sorry! We couldn't be helpful
Thank you for your feedback
Feedback sent
We appreciate your effort and will try to fix the article